Build a Sparse Reward PySC2 Agent
Click here to share this article on LinkedIn »
In my last few tutorials, I covered how to build a PySC2 agent that used machine learning to build units and attack the enemy. If you followed along you may have noticed that the agent had interesting results, for example it would often get wait outside the enemy base, waiting for units to emerge so it could reap the rewards.
In this tutorial we will shift to using sparse rewards, essentially the agent will get a reward of 1 for winning the game, or -1 for losing the game. It might take a bit more training, but the end result should be more wins.
Let’s get started.
Note: For those who have followed my previous tutorials, a lot of the code in this tutorial may look familiar but there are actually some important differences. I will try to point these out for you.
1. Set Up
First, let’s set up the imports and some variables we will use:
The last item here is new, it will allow us to command SCVs to gather minerals.
I have added the army supply ID here to make it easier to follow the code.
Once again there is a new unit ID here, for detecting the location of mineral patches.
The last action type here is new, it’s quite cool in that it will allow us to select all of the units of the same type on screen in one action.
This is the prefix for the file where we will store our Q Learning table. This will allow us to end and resume training, which will come in handy when we need to run hundreds of episodes.
You might notice a few actions are missing here, in this tutorial we are going to condense a sequence of actions (e.g. select barracks, train marine) into a single action (e.g. train marine). I will explain it more as we go.
If you have worked through my previous tutorials, you might recognise that this is splitting the mini-map into four quadrants. This is to keep the action space relatively small to make it easier for the agent to learn.
2. Add the Q Learning Table
As with my previous tutorials, we will be using a Q Learning Table. Please note that this one has been updated to support some pandas updates that seemed to cause issues for some people.
The last four lines here are different to my previous tutorials, instead of applying the full reward at each point, we are not only applying the full reward if the state becomes terminal, such as a win or loss. All other learning steps will discount the reward.
I’m always amazed at how little code is required to make reinforcement learning work!
3. Create the Agent
The agent starts of the same as previous tutorials, we leave all of the QLearningTable settings at their defaults.
We have added a couple of properties cc_x and cc_y to keep track of the command centre location.
The other new property move_number will track the sequence position within a multi-step action.
This code is quite cool, if sparse_agent_data.gz exists, it will load the Q Learning Table data from this file, which allows you to resume learning from a previous position. If you need to stop training or there is some sort of bug that causes your agent to crash, you can simply restart it and your learning history is not lost.
The first two methods are the same as previous tutorials, they essentially allow us to invert the screen and mini-map locations if the base is located at the bottom-right, such that all actions can be treated as being performed from the top-left, allowing our agent to learn more quickly.
The last method is a utility that allows is to extract the information we need from our selected action.
You may not have seen obs.first() before, this method essentially tells you if it’s the first step in an episode (game), so here you can set up any data that you need for the rest of the game.
Here we are just setting up a few counts that we can use for the state and other code that needs to know what we have. You can read a more detailed explanation here.
OK, we now have a base agent which should run, but not achieve anything.
4. Add the First Step of the Multi-Step Actions
As I mentioned previously, we are going to condense several actions into a single action, which makes our action space simpler, which should help our agent to learn more quickly. All of our multi-step actions will consume 3 steps, even if they require less, so that the learning call is always done every 3 game steps to keep things consistent.
The main actions we will have are:
- Do nothing — do nothing for 3 steps
- Build supply depot — select SCV, build supply depot, send SCV to harvest minerals
- Build barracks — select SCV, build barracks, send SCV to harvest minerals
- Build marine — select all barracks, train marine, do nothing
- Attack (x, y) — select army, attack coordinates, do nothing
Unfortunately sending the SCVs back to mineral patches is not perfect, but seems to work reasonably well. The purpose behind this is to step SCVs from being selected instead of barracks when they are positioned next to a barracks.
Insert the following code after the barracks_count line from the previous step:
To start, we are checking if this is the first step in the multi-step action, indicated by self.move_number containing a value of 0. We increment the number so that on the next game step we will proceed with the second step of the multi-step action.
Next we set up the state to include the counts of each of our building types and our marine count.
Now we divide our mini-map into four quadrants, and mark a quadrant as “hot” if it contains any enemy units. If the base is at the bottom-right we invert the quadrants so that all games are seen from the perspective of a top-left base, regardless of the actual base position. This should help our agent to learn more quickly.
If we are not at the first overall game step, we call the learn() method on our Q Learning Table. Since this is only done on the first step in each multi-step action, the state will be taken and learning performed on every third game step.
Next we choose an action and break out any x and y coordinates if they exist.
The first step for building a supply depot or barracks is to select an SCV. We do this by identifying all SCV points on the screen and clicking one at random.
The first step for building a marine is to select a barracks. In fact by sending the _SELECT_ALL value we can select all barracks on the screen simultaneously. The major advantage of this is that the game will automatically queue the next marine at the least busy barracks, taking care of the need to select the correct barracks first.
The first step for attacking a location is to select the army.
5. Add the Second Step of the Multi-Step Actions
Add the following code directly below the code from the previous step:
We start by incrementing the move number and extracting our action details.
The second step for building a supply depot is to command the SCV to build the depot at a given location. By using our stored command centre location we will be able to build a supply depot even if our command centre has been destroyed.
In order to make things easier for our agent, each supply depot location is hard coded, so it only needs to know that it decided to build a supply depot, not where that supply depot was located. This makes our state and action spaces a lot simpler as we don’t need to track these details.
One problem that can occur here is that your first supply depot can be destroyed after your second supply depot has been built, but your agent will think your one depot is at the first position and thus try to build your second depot where one already exists. Although you could try to fix this, I did not find it necessary, and usually once the enemy destroys one of your barracks you are probably about to lose anyway.
The second step for building a barracks is much the same as the supply depots, only the coordinates are different.
The second step for training marines is pretty simple, tell the barracks to train the marine! We queue the command so that the barracks can queue up several marines in a row, which is handy when the army is attacking and needs reinforcements.
The second action for attacking is to simply command the army to attack a location on the mini-map.
In order to prevent accidentally selecting SCVs and trying to attack with them, we check both the single_select and multi_select spaces to ensure we have not selected SCVs.
Once we are sure we have the army selected, we randomly choose a location around the centre of the quadrant. This allows us to keep our action space to only fourattack coordinates, but helps the agent to attack around the quadrant and not leave any enemy units untouched.
6. Add the Final Step of the Multi-Step Actions
Add the following code directly after the code from the previous step:
The only step left to perform is the send SCVs back to a mineral patch. Note that this action is queued so it will be performed once the SCV has finished building the supply depot or barracks.
All other skipped or invalid actions will fall through to a _NO_OP call.
7. Detect Game Completion
The final step is to detect the end of a game, apply the reward, and clear any properties for the next episode.
Add the following code at the beginning of your agent’s step() method, after the super(SparseAgent, self).step(obs) call:
Just like the obs.first() call we made earlier, the obs.last() call allows us to detect the last game step in an episode.
Fortunately for us, DeepMind provides the reward we need as part of the observation, in the form of obs.reward. This value will be either 1 for a win, -1 for a loss, or 0 for a stalemate or if the episode reaches 28,800 steps.
It is possible to increase this episode step limit using the game_steps_per_episode command line parameter, however it is not necessary.
Next we apply this reward to our Q Learning Table, but instead of the current state, we pass in a string of terminal, indicating a special state that applies the full reward (multiplied by the learning rate) rather than the discounted reward.
We output the Q Learning Table data in gzipped pickle format, so that it can be reloaded if our agent is stopped for any reason.
Then we reset our agent so that it can start fresh. Note that these could be reset on the first step but it seems cleaner to me to do so here.
We immediately return a _NO_OP call since there is no value in proceeding any further in our code.
8. Run the Agent
In order to run the agent, execute the following from the command line:
python -m pysc2.bin.agent \
--map Simple64 \
--agent sparse_agent.SparseAgent \
--agent_race T \
--max_agent_steps 0 \
--norender
After 1035 games my agent’s record looked like this:
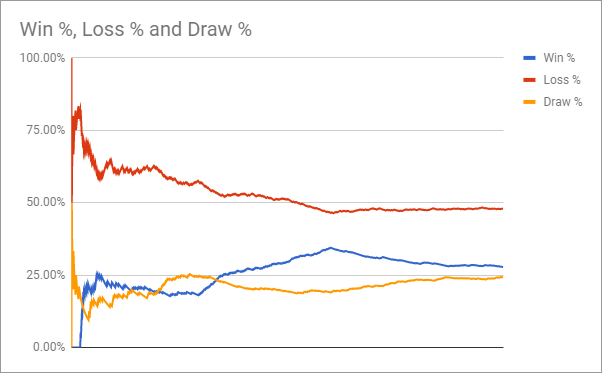
I was pretty impressed that an agent using the default settings would lose less than 50% of the time. In my next tutorial I will cover how to get the win rate up over 70%.
You can find the reward history and final Q Learning Table data here.
All code from this tutorial can be found here.
If you like this tutorial, please support me on Patreon. Also please join me on Discord, or follow me on Twitch, Medium, GitHub, Twitter and YouTube.


