Building RESTful Api With Node.js, Express.Js And PostgreSQL the Right way

After my article about “Generating a Pdf with Nodejs and Cloudinary” i got few feedbacks from folks requesting that i write an article on Building RESTful Api’s with NodeJs. So i decided to put this piece with the hope that it will help somebody.
What we will build?
You’ll learn how to build a public bus transportation booking API — Such that Users book tickets for their trips, can see all their bookings and have the right to cancel any booking.
The only impossible journey is the one you never begin. 🙌— Tony Robbins
Table of Content
- Getting Started
- Prerequisite
- Project Setup
- Project Structure
- Setting up Database(PostgrelSQL)
- Server Helpers
- Authentication & Authorization with JWT
- Setup Controllers
- Setup Routes
- Server Setup
- Testing with POSTMAN
- Conclusion
Getting Started
In this post, I’ll explain how to connect and use PostgreSQL Database to store data. We will also learn how to write some basic [SQL](Structure Query Language) queries. SQL is a standard language for storing, manipulating and retrieving data in databases. To make this simple and so that we can have a better understanding of how SQL works, I’m not going to make use ORM(Object Relational Mapping) in this post. Check out this answer on stackoverflow to get a better understanding of ORM. ORM is basically a technique that allows us to query and manipulate data from the database with little knowledge of SQL. ORM packages expose some methods needed to query and manipulate the data in the database. We have several ORM packages that could be used with our database e.g Sequelize. Instead of using an ORM, we will use PG NodeJS package directly — PG is a NodeJs package for interfacing with the PostgreSQL database. Using PG alone will also give us the opportunity to understand some basic SQL queries as we will be querying and manipulating data in the DB using raw SQL queries.
Prerequisite
Although I’ll try to keep things simple. However, having some basic Knowledge about Nodejs before diving into this Tutorial is important, this post assumes that you have Nodejs and Npm installed in your PC, if you don’t kindly follow this guide.
Project Setup
- Create a new project directory on your system, you can call it
transportApi - Change working directly to the project and run
npm initon your terminal or command prompt if you're using a window system - Runningnpm initwill prompt you with some questions to help set up your project

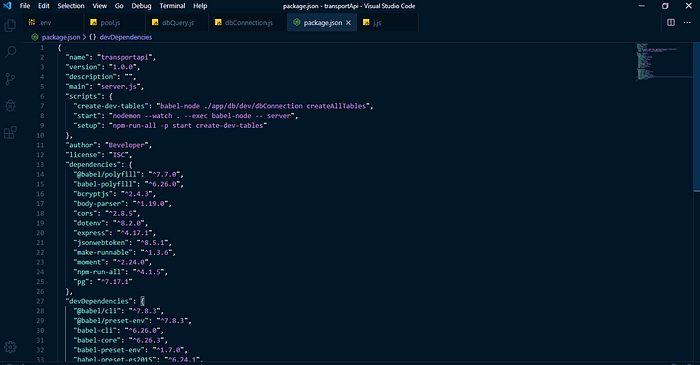
When that is done, you should see package.json file in your project and it contains basic information about your project.
{"name": "transportapi","version": "1.0.0","description": "","main": "server.js","scripts": {"test": "echo \"Error: no test specified\" && exit 1"},"author": "Beveloper","license": "ISC"}
Installation of all dependencies for the project:
We are going to install the required dependencies needed for this project no fancy external packages e.g Morgan e.t.c.
- expressjs — Expressjs is a nodejs web application framework that gives us the ability to create quick and easy APIs.
- PG— PG is a NodeJs package for interfacing with the PostgreSQL database.
- JSON Web Token (JWT)— is an open standard for securely transmitting information between parties as a JSON object. It’s pronounced jot, or as our Dutch friends would say, yaywaytay. JWT is commonly used for authorization. JWTs can be signed using a secret or a public/private key pair. Once a user is logged in, each subsequent request will require the JWT, allowing the user to access routes, services, and resources that are permitted with that token.
- Body Parser — Parse incoming request bodies in a middleware before your handlers, available under the
req.bodyproperty. - Moment — Is a lightweight JavaScript date library for parsing, validating, manipulating, and formatting dates.
- Dotenv — Is a zero-dependency module that loads environment variables from a
.envfile intoprocess.env - CORS (Cross Origin Resource Sharing) — Is a node.js package that allows requests to skip the Same-origin policy and access resources from remote hosts.
- Bcryptjs — is a secured way to help you hash passwords.
- @babel/polyfill — is a toolchain that is mainly used to convert ECMAScript 2015+ code into a backwards compatible version of JavaScript in current and older browsers or environments.
- babel watch — This is needed for development. One thing that babel watch package does is to compile our code and reload the server each time we make changes to our code.
Run the following command to install all the above packages
$ npm install --save express pg moment body-parser dotenv jsonwebtoken cors make-runnable bcryptjs @babel/polyfill npm-run-all $ npm install --save-dev babel-core babel-cli babel-preset-env babel-watch babel-preset-es2015 babel-register
If all went well, you should see something similar to this
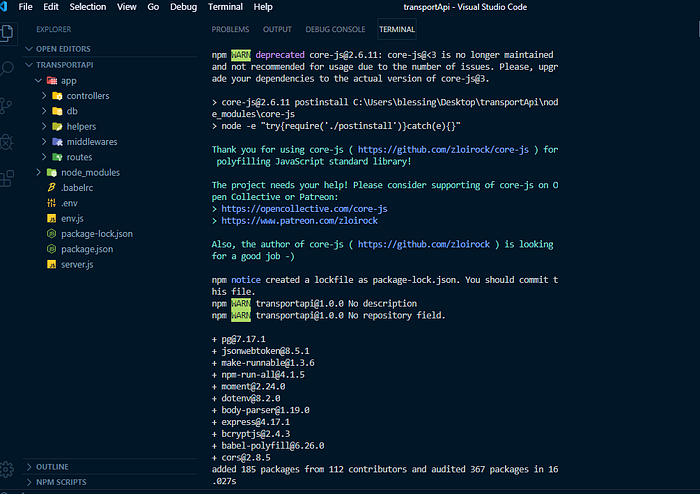
You’ll notice that express and moment etc is under dependencies, that is because those are needed by the time we deploy our code to production. babel-cli, babel-preset-env and babel-watch etc are only needed during development.
Project Structure
Install PostgreSQL on your system. If you don’t have it installed on your PC walk through this guide
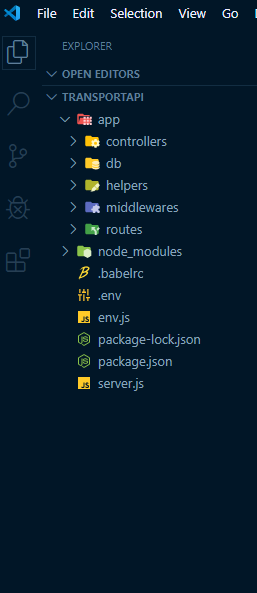
Set up your project structure using the following format;
TransportApi |-app
   |-controllers
   |-db
   |-helpers
   |-middlewares
   |-routes
 |-node_modules
 |-.babelrc
 |-.env
 |-env.js
 |-package-lock.json
 |-package.json
 |-server.js
Set Up Database
Lets create our DB and name it transportApi. To create the DB, we can make use of any PostgreSQL client such as POSTICO for Mac Users or PgAdmin4 for window users.
If you need a guide on out to setup PostgrelSQL on your PC checkout this easy to read guide
Create TransportApi Table
First, let save our Database URL in the system environment. Your Database URL should be in the following formatpostgres://{db_username}:{db_password}@{host}:{port}/{db_name}
e.g postgres://transportUser:develop@localhost:5235/transport
If you were unable to set your DB locally, the easy way out is to make use of any PostgreSQL cloud DB such as ElephantSQL. If you use cloud PostgreSQL DB, copy the URL and use it instead.
My port may differ from yours, so ensure you use the correct p.
ENVIRONMENT VARIABLE SETUP
Open the .env file located in the root directory, copy and paste the codes into it.
#.envDATABASE_URL=postgres://transportUser:develop@localhost:5235/transportPORT=5253
- We defined a few environment variables (
DATABASE_URL AND PORT) so we can use them later across our project.
Next, we need to create transportApi table in our DB. This is where we will start making use of pg package with basic SQL query to create the table.
Inside our db folder create a folder called dev and create three files named dbConnection.js, dbQuery.js and pool.js respectively.
The files should look like this.
Code Steps:
- Import
Poolobject frompg. Check pg documentation to read more onpooling. We use this to connect to our PostgreSQL Db. Pool is the easiest and common way of using pg. You can also make use of their Client API to connect to the DB. - Import
dotenvfromdotenvand load it usingdotenv.config()- what this does is to search for.envfile in our project and load its content into the system environment so we can use nodeprocess.envto access those variables. - We create a new instance of
Pooland pass inconnectionStringto its constructor. We useprocess.env.DATABASE_URLto getDATABASE_URLvariable from the system environment. - We listened to pool
connectevent and console logconnected to the db
Code Steps:
- We created a new method
querythat takes in two argumentstext- query text andparams- values required bytext. These two arguments are what is needed to query the DB. The method returns a promise and we will call it in our controller. Click here to read more about JavaScript Promise.
Code Steps:
- Import
Poolobject frompg. Check pg documentation to read more onpooling. We use this to connect to our PostgreSQL Db. Pool is the easiest and common way of using pg. You can also make use of their Client API to connect to the DB. - We listened to pool
connectevent and console logconnected to the db - We set up a
createTables()function, inside the function is a query that createsuserTbale, busTable, tripTable and bookingTablerespectively with unique fields.
const createUserTable = () => { const userCreateQuery = `CREATE TABLE IF NOT EXISTS users (id SERIAL PRIMARY KEY, email VARCHAR(100) UNIQUE NOT NULL, first_name VARCHAR(100), last_name VARCHAR(100), password VARCHAR(100) NOT NULL, created_on DATE NOT NULL)`;
What the above does is to tell PostgreSQL DB to create users table if users table does not exist with fields listed and the same goes for the rest of the tables respectively.
Using the first Table(usersTable) as Case study, we observe the following;
- We call
poolquery method withuserCreateQueryas an argument and it returns apromise.
We calledpool.end()to closepoolconnection to the db. - We created another function called
dropTables()- What this does it to deleteuserstable.
We set up a new queryDROP TABLE IF EXISTS users, that drops users table if it exists in the DB. - We use
pool.on('remove')to listened topoolremoveevent and useprocess.exit(0)to exit the node process. - Lastly, we require
make-runnablepackage - We need this to be able to call and any of our two functions from the terminal.
Note: You have to requiremake-runnableat the end. Remember we’d earlier installedmake-runnableas a project dev-dependency.
You'll also notice that we usedrequireinstead ofimport, this is because we only want to rundb.jsfile from the terminal alone and it is not directly part of our project so there is no point in compiling it.
Finally, lets runcreateTablesfunction to create our tables. To do this we need to add a command in ourPackage.jsonfile.
In your start script remove the test command and add this
"scripts": {"create-dev-tables": "babel-node ./app/db/dev/dbConnection createAllTables","start": "nodemon --watch . --exec babel-node -- server","setup": "npm-run-all -p start create-dev-tables"},
Your package.json should know look like this
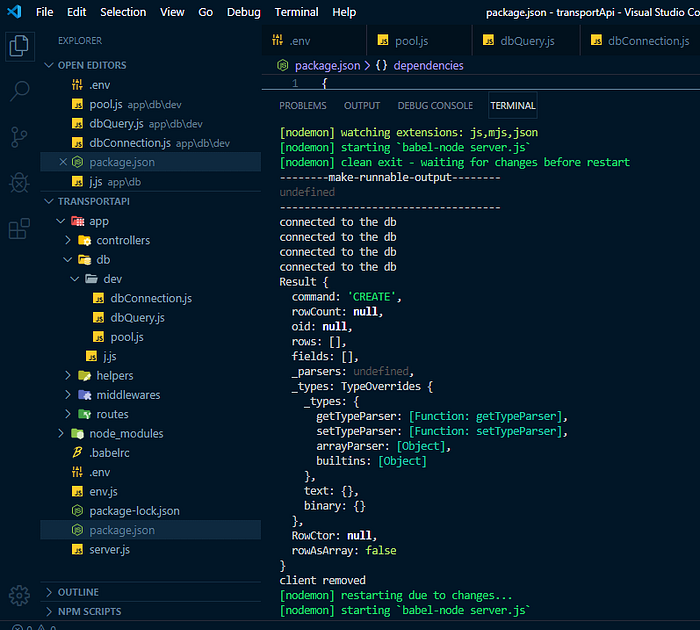
Next, we run the command $ npm run setup

After running the above, you should see something similar below;
NOTE: Instead of going through the above process, you can also create tables directly either using any PostgreSQL client e.g pgAdmin, POSTICO or using PostgreSQL commands on the terminal.
SETUP HELPERS
Before diving to the core project, there’s need to create a few helper methods, that would foster resuability across our project.
Copy the following and paste it inside app/helpers/validations.js
Code Steps:
isValidEmail()method uses regex(Regular Expression) in validating user's provided email address.
Check this guide to learn more about RegexvalidatePassword— This method checks if the length of the password provided by a user at the time of signup or signin is less than or equal to 5 characters.isEmptymethod checks if any input provided by a user is undefined or empty.- We exports this methods so we can use them across our projects.
Copy the following and paste it inside app/helpers/status.js
Code Steps:
- Created an Object status and defined a few properties with values.
- Success — This returns a status code of 200 when a user performs a post request
- Error — This returns a status code of 500 when a user encounters a glitch
- Notfound — As the name implies when a user tries to perform an undefined request a status code of 404 is returned, another name for forbidden😜.
- Unauthorized — Such status occurs when a user accesses a path/page without been authorized, in this case a status code of 401 is returned.
- Created — When data is created, a status code of 201 is returned.
- Bad — A good use case is when an invalid email is provided, a status code of 400 is returned.
- Nocontent — When a user submits an empty form, then a status code of 400 is returned.
- Conflict — A good use case is when a user inputs an email that already exists. A 409 status code should be returned.
- We exports this methods so we can use them across our projects.
AUTHORIZATION AND AUTHENTICATION(JWT)

As we proceed in thus tutorial our project would have a few routes that need protecting and some user’s that need authorizing. Much like myself at one point, you’re probably wondering how this can be achieved. Thankfully, we have JSON Web Tokens (JWT) (among other things) for that.
JSON Web Token (JWT) is an open standard that defines a compact and self-contained way of securely transmitting information between parties as a JSON object. This information can be verified and trusted because it is digitally signed.
Authorization is the most common scenario for using JWT. Once the user is logged in, each subsequent request will include the JWT, allowing the user to access routes, services, and resources that are permitted with that token. Single sign-on is a feature that widely uses JWT nowadays, because of its small overhead and its ability to be easily used across different domains.
There are some advantages of using JWT for authorization:
- Purely stateless. No additional server or infra required to store session information.
- It can be easily shared among services.
In its compact form, JSON Web Tokens consist of three parts separated by dots (.), which are:
- Header
- Payload
- Signature
Therefore, a JWT typically looks like the following.
xxxxx.yyyyy.zzzzz
Now, time for some code.

AUTHENTICATION
jwt.sign()
jwt.sign(payload, secretkey, [options, callback])
The first function jwt.sign() will generate a JWT token, assign it to a user object, and then return that JWT token so we can pass it where ever we may need. It can be either asynchronous or synchronous depending if a callback is supplied. The payload parameter will be the user object in our case, the secretkey is made up by you, and it can be anything. The callback parameter is where we handle sending our token, and the options parameter will be where can set an expiration time among other things.
Copy the following codes and paste it app/helpers/validations.js
Code Steps:
Inside validation.js we have a function generateUserToken
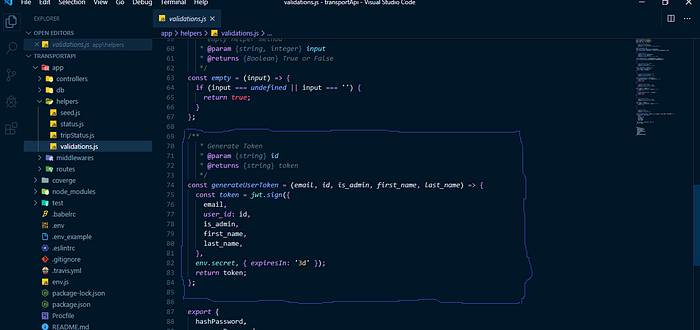
- We imported jsonwebtoken(JWT) and dotenv from their respective modules.
- We created a function
generateUserToken, we usedjwt.sign(..)in signing user's token, by sending email, user_id, is_admin(will be discussed later ), first_name and last_name as the payload, we also passed our secret and setting token to expire in 3 days. .
AUTHORIZATION
jwt.verify()
jwt.verify(token, secretkey, [options, callback])

jwt.verify() will verify the users token when a protected route is accessed. It takes in the token as one parameter, the secret key that you defined in the jwt.sign() function, and then you have the options and callback parameters. The callback will be where we can access and send protected data.
Copy the following and paste it app/middleware/verifyAuth.js
Code Steps:
Here, we create a new Auth object with verifyToken() method. What verifyToken() method does is basically to validate and decode user request token using the same secret key we used in signing the token. We used const{token} = req.headers to get the token from the request header and send it to jwt.verify(..) along with the secret we used in signing the token. If the token is valid, we retrieve email, user_id, is_admin,first_name, last_namefrom the token payload and query the DB to make sure the user exists in the DB. If the user exists in the DB, we created a new object property in the req object. We will use this to process other requests handler. Finally, since this method is a middleware, we used next() in moving to the next request handler. If any error occurred in here, we return an error message back to the user without having to move to the next request handler.
SETUP CONTROLLERS
Next, we need to setup our controllers for our projects and starting with is our admin and User controller.
adminController
Copy the following and paste it inside app/controllers/adminController.js
Code Steps:
Note: There are a few routes that needs an admin privilege to access
- Here, we created two methods —
createAdminandupdateUserToAdmin. We also made use ofasync/await. - we Import moment, and the reason for that is because we’re going to be using it for date creation.
- We imported our dbQuery from
app/db/dev/dbQuery.js. - we also imported our status helper methods
emptyanderrorMessage,successMessage, statusfromapp/helpers/status.js. - we also imported our validations helper methods
hashPasswordandcomparePassword, isValidEmail, validPassword, isEmpty, generateUserTokenfromapp/helpers/validations.js. - We created a function
createAdmin, in it we deconstructed our valuesemail, first_name, last_name, is_admin, passwordfrom the request body. - Next, we created a variable named created_on, which holds the date of our created user table.
- Next we check if our email is a valid, using our helper method
isValidEmail. - Also, we check if our password characters is more than 5.
- Using our helper method
hashPassword, we hash our password using the bcryptjs module.
usersController
Copy the following and paste it inside app/controllers/usersController.js
Code Steps:
- Here, we created two methods —
createUserandsignUser. We also made use ofasync/await. - we Import moment, and the reason for that is because we’re going to be using it for date creation.
- We imported our dbQuery from
app/db/dev/dbQuery.js. - we also imported our status helper methods
emptyanderrorMessage,successMessage, statusfromapp/helpers/status.js. - we also imported our validations helper methods
hashPasswordandcomparePassword, isValidEmail, validPassword, isEmpty, generateUserTokenfromapp/helpers/validations.js. - We created a function
createUser, in it we deconstructed our valuesemail, first_name, last_name, passwordfrom the request body. - Next, we created a variable named created_on, which holds the date of our created user table.
- Next we check if our email is a valid, using our helper method
isValidEmail. - Also, we check if our password characters is more than 5.
- Using our helper method
hashPassword, we hash our password using the bcryptjs module. - Next, we created a variable named created_on, which holds the date of our created bus table.
- For our SQL query, we used
INSERT INTO users(list_columns_here..) VALUES($1, $2, $3, $4, $5...)- what this does is create a new row inuserstable and insert the supplied values into its fields.valuesis an array of values that contains what we want to insert into the table. The elements insidevaluesarray must be in the same order as$1, $2, $3, $4, $5. We usedreturning *to return the created row. Remembered we createdquerymethod that takes in two argumentsquertTextandparamsinsideapp/db/dev/dbQuery.js, this is where we will use it. We called the method and send increateUserQueryand values as parameters. - we made use of try and catch, i 💕 it.
- Using generateUserToken helper method we generated our user token.
JWT will be discussed later in this post. _bt_check_unique— Checks for duplicate values and returns an error.
Since dbQuery.query returns a promise we make use of async/await to make our code looks sexy😘.
signUser- We set upSELECT * FROM users WHERE email = $1to get a user with a specific email.- Similar to createUser function, it checks for if email and password is incorrect, it also compare the passwords and ensures that both password and email inputed by the user are correct before signing them.
- Also, a user gets a Token, when he signs in. Thats made possible by our generateUserToken.
- And finally we exported our methods
createUser and signUserrespectively, so we can use them across our project.
busController
Copy the following and paste it inside app/controllers/busController.js
Code Steps:
- Here, we created two methods -
addBusDetails()andgetAllBuses(). We also made use ofasync/await. - we Import moment, and the reason for that is because we’re going to be using it for creating our date.
addbusDetails()- We imported our dbQuery fromapp/db/dev/dbQuery.js.- we also imported our helper methods
emptyanderrorMessage,successMessage, statusfromapp/helpers/validations.js. andapp/helpers/status.jsrespectively. - We created a function
addBusDetails(), in it we deconstructed our valuesnumber_plate, manufacturer, model, year, capacityfrom the request body. - Next, we created a variable named created_on, which holds the date of our created user table.
- We also check to see if the input fields are empty using our
emptymethod, if its empty it sends an error “all fields are required” and returns a status code of 400. - For our SQL query, we used
INSERT INTO bus(list_columns_here..) VALUES($1, $2, $3, $4, $5, $6 ...)- what this does is create a new row inbustable and insert the supplied values into its fields.valuesis an array of values that contains what we want to insert into the table. The elements insidevaluesarray must be in the same order as$1, $2, $3, $4, $5, $6. We usedreturning *to return the created row. Remembered we createdquerymethod that takes in two argumentsquertTextandparamsinsideapp/db/dev/dbQuery.js, this is where we will use it. We called the method and send increateBusQueryand values as parameters. SincedbQuery.queryreturns a promise we make use ofasync/awaitto make our code looks sexy😘.
tripController
Next, we’d be creating our tripController, similar to the bus Controller.
Copy the following and paste it inside app/controllers/tripController.js
Code Steps:
The tripController is almost similar to that of the BusController earlier created, but with few additions
- Here, we created two methods —
createTrip(), getAllTrips()cancelTrips, filterTripByOrigin, filterTripByDestination. - CancelTrips — We set up
UPDATE trip SET status=$1 WHERE id=$2 returning*to cancel trips according to trip ID. - filterTripByOrigin — We set up
SELECT * FROM trip WHERE origin=$1 ORDER BY id DESCto filter the origin of a users trip from the descending order . - filterTripByDestination — We set up
SELECT * FROM trip WHERE destination=$1 ORDER BY id DESCto filter the destination of a user trip from the descending order .
bookingController
Next, we’d consider the bookingController which seems to be an important part of our transportApi.
Copy the following and paste it inside app/controllers/bookingController.js
Code steps:
The bookingController is almost similar to that of the BusController earlier created, but with few additions
- Here, we created four methods —
createBooking(), getAllBooking, deleteBooking, and updateBookingSeat.
The first two methods createBooking and getAllBooking are same with the previous explanations in our busController. - DeleteBooking — We set up
UPDATE trip SET status=$1 WHERE id=$2 returning*to cancel trips according to trip ID. - UpdateBookingSeat— We set up
UPDATE booking SET seat_number=$1 WHERE user_id=$2 returning*to update bookings according to the users ID and the seat number of a user, during booking.
If you have gotten this far, you deserve a thumbs up!
SETUP ROUTES
Next, we’d consider setting up our routes for every individual controller created.
BusRoutes
Copy the following and paste it in app/routes/busRoute.js.
Code Steps:
- We imported express.
- Next, we imported all methods created in our busController in
app/controllers/busController.js. - We declared a variable(router), that holds our express router.
- We defined our routes using our router variable and passing request methods(POST, PUT,PATCH,GET) with matching routes e.g
router.post('/buses', addBusDetails), router.get('/buses', getAllBuses)etc.
NOTE:
- Although the routes are same but the request methods differs, therefore handles different request.
- The same pattern applies to all routes in this tutorial
- Each request to any of the endpoint will pass through
verifyAuthmiddleware before processing the actual request. With this new setup, a user without a valid token will get an error.
BookingRoutes
TripRoutes
SETTING UP OUR SERVER
Now that we’ve our Controller and Route setup, lets see how to put everything together.
Copy the following codes and paste it in app/server.js.
Code Steps:
.We installed babel-polyfill npm package and imported it — We need this here so that node runtime will recognize async/await and Promise.
.We imported the necessary packages from their respective modules
.Next, we imported all the routes from our routes folder
.Adding cors middleware for parsing URL encoded bodies (which are usually sent by browser)
.Express.urlencoded is added as a middleware for parsing JSON and urlencoded data and populating `req.body`.
.Next, we versioned our Api '/api/v1', userRouteand appended the respective routes.
.Lastly we listened to our port so we can start the server.
TESTING WITH POSTMAN

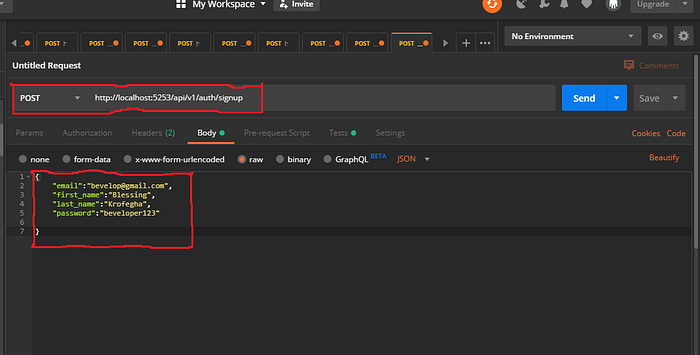
Create User — POST api/v1/signup
Create Admin— POST api/v1/admin/signup
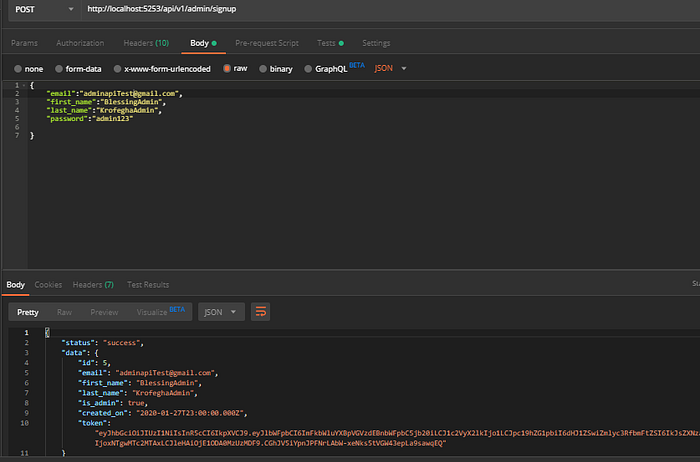
Copy Token and put it in the Header
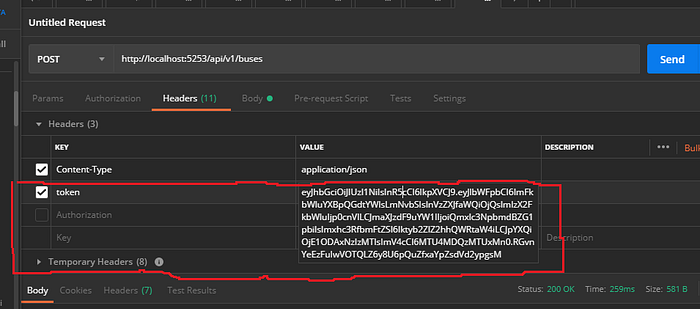
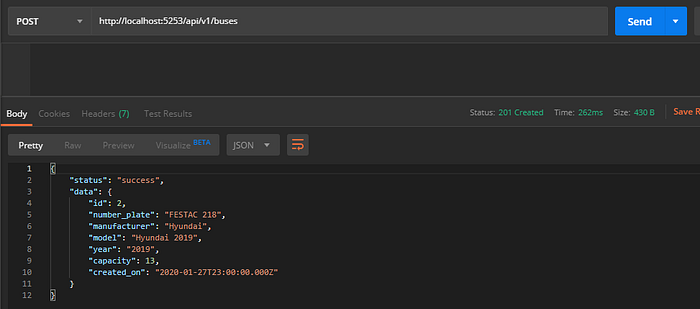
Create Buses— POST api/v1/buses
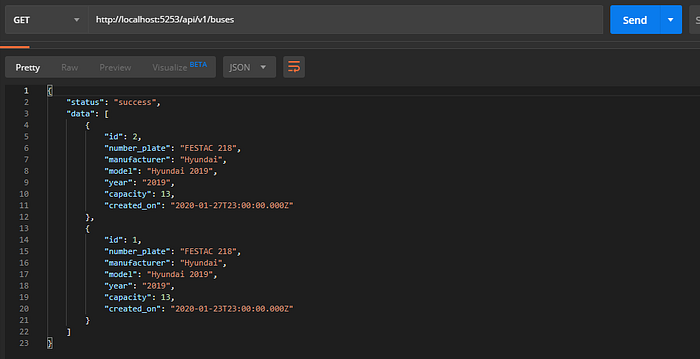
Get Buses— GET api/v1/buses/
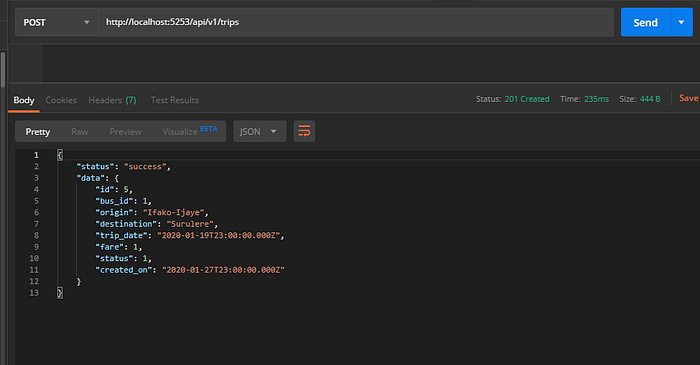
Create Trip— POST api/v1/trips
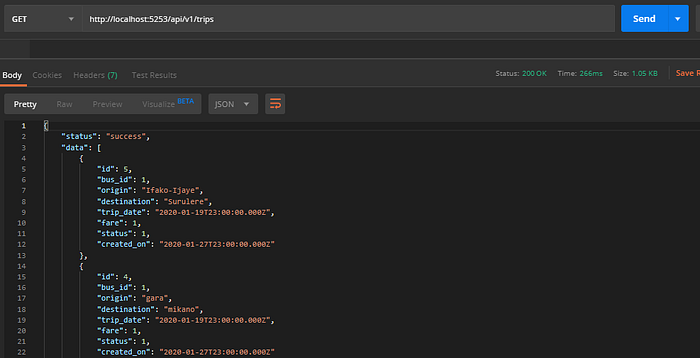
Get Trips— GET api/v1/trips
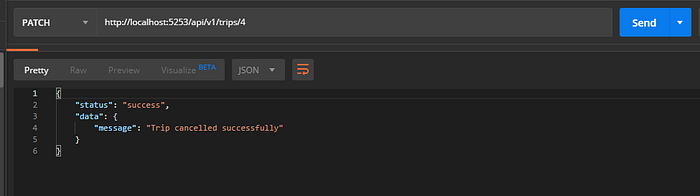
Cancel Trips — PATCH api/v1/trips/:tripId
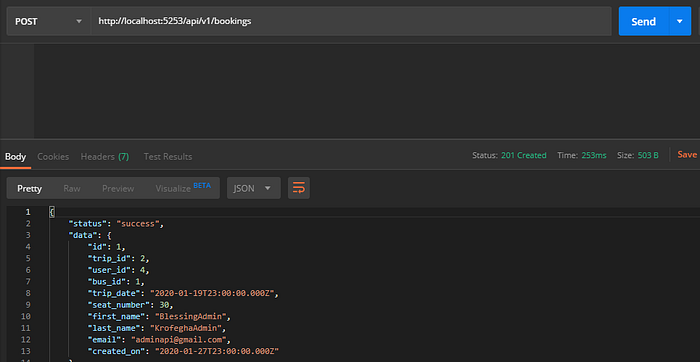
Create Booking— POST api/v1/bookings
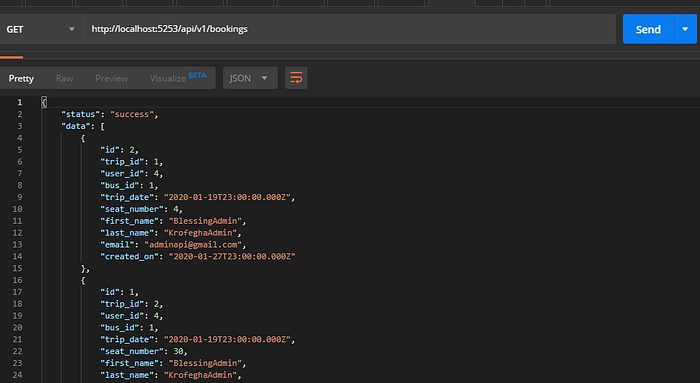
Get Bookings— GET api/v1/bookings
CONCLUSION
We just successfully built our Transport Backend App.
If you came thus far congrats, ✌.
Surely, you’ve got questions or issues as you went through this tutorial, kindly drop your comments and you’d be responded to ASAP.
Once again thanks for reading, Clap, and share!👌
Follow me on Twitter let’s discuss.
Check out the complete code here
Resources
- Why You as a Developer Should be Using a CMS
- Headless Commerce Explained: Definitions, Use Cases, and Roadblocks | Agility CMS
- APIs vs. SDKs: What’s the Difference? | Agility CMS
- TOP Static Site Generators to Watch in 2021
- https://agilitycms.com/resources/posts/what-s-the-difference-between-headless-cms-and-static-site-generator/
- What is Netlify and Why Should You Care as an Editor? | Agility CMS
- What is a Headless CMS? | Agility CMS
- Benefits of Headless CMS vs a Traditional CMS | Agility CMS
- Content Architecture: The Key to Organizing and Managing Your Content and Team
- WordPress And Its Alternatives: Headless CMS | Agility CMS
- Open Source CMS vs. Proprietary CMS: Can You Have the Best of Both? | Agility CMS
- Choosing a React CMS: What to Look For? | Agility CMS
- Take control of your Content Architecture: Content Modelling
- DXP vs Headless CMS: Modern DXP Architecture
- Jamstack Development: 10 JAMstack Pioneers You Need To Know About in 2021