Continuous Infrastructure Deployment with Terraform Cloud

Terraform & Automation
At my last company, we used Terraform a lot. It allowed us to create infrastructure repeatably and leverage each others’ code to do so. It also gave us a standard method to make infrastructure changes without teams writing their own ad-hoc tooling, all while documenting that infrastructure in the form of code! If you’re familiar with Terraform, or other infrastructure as code tools you probably already understand and reap the benefits of using them as well.
However, there comes a point where Terraform requires shared structure and workflows in order to keep environments consistent and enable collaboration among team members. For this, you might use remote state, workspaces, or tools like Terragrunt. This is also where options like Terraform Cloud, Spacelift, env0, Scalr, or Atlantis come into play. These Terraform automation tools coined “TACOS” by CloudPosse (Terraform Automation & Collaboration Software) provide a variety of benefits that are hard to match when rolling your own infrastructure automation. These include:
- Hands off, secure backends for your Terraform state
- Shared plan output for easier collaboration
- Terraform Version Locking
- Additional permission management outside of version control
- Webhooks and “triggers” of one workspace based on the run of another
- Policy as Code frameworks like OPA or Sentinel
- API driven Terraform runs
- Cost estimation
- State auditing & diffs
- A private module registry
While these tools tend to have a similar set of features, today I will be exploring Terraform Cloud to automate infrastructure changes via GitHub Actions and promote those changes from one environment to the next. As a demonstration, I’ll be creating a small AWS module with 3 different environments: “tst”, “stg”, and “prd”. Each of these environments will be in the AWS region “us-west-2”.
The goal of this post will be to explore 3 things:
- Handling multiple environments in the same module using “workspaces” and the Terraform Cloud backend.
- Automating the process of applying changes from one environment to the next.
- Using Sentinel policies which prevent infrastructure updates that don’t conform to spec.
Update 06/02/21
I was informed after posting this article that it actually is possible to use the -tfvars option in Terraform Cloud by providing the TF_CLI_ARGS environment variable. While I haven’t tried it yet, this would solve the main issue I had with Terraform Cloud while creating this demo, which as you’ll see was not being able to provide a specific *.tfvars file for each specific environment, meaning I had to do some code adjustment to compensate. Instead, I could have set TF_CLI_ARGS in each workspace to the specified tfvars . If that doesn’t make sense it should by the end of the post.
Shout out to Jeremy Gaither for pointing that out.
Project Setup
Without wasting any more time, let’s get into the code (which you can find in this repo).
The folder structure I’ll be using will be as follows:
├── module
├── sentinel
├── usr_mgmt
└── workspaces
If this were a real environment each of these folders represents a set of resources that might be its own repository, but for the purpose of this demo I’ll be keeping them together. Without worrying too much about the other folders for now, the resources I will be deploying will go into the module directory.
Here’s the simple module I’ll be deploying:
And the variables accompanying it:
(edit: This is where the 06/02/21 update would change things. Instead of one vars file, each of these blocks would be in its own environment-specific vars file, e.g. prd-us-west-2.json . That vars file would then be specified in the automation process via the TF_CLI_ARGS environment variable, e.g. TF_CLI_ARGS="-var-file=prd-us-west-2.json" )
You might immediately notice some odd things about my variable declarations. Instead of defining each variable on its own, I’ve defined them all inside of a map called “variables”. This isn’t a normal pattern.
If you’re familiar with Terraform, you know that generally different input variables are provided via variable files or variable arguments. For each environment, a specific set of config variables can be provided in a file using the -var-fileflag or via -var. However, Terraform Cloud doesn’t currently support providing vars or var files via the CLI.
Instead, you have three choices:
- Use the Terraform Cloud variable resource for all of your variables (which is extremely cumbersome and completely unrealistic).
- Use completely different folders with the same code, or potentially a call to a module.
- Make each of your variables a map and selecting the variable depending on the workspace, which is what I’m doing here.
My workspace is defined by a combination of the environment( tst, stg, or prd) and aws_region. These are then concatenated as a local variable inside the module, which gives me tst-us-west-2, stg-us-west-2, and prd-us-west-2. As you’ll see in a second, these two variables (environment and aws_region) will be supplied to the workspace via Terraform cloud, so the developer wont have to worry about setting them. They can then be used to retrieved environment specific variables, like so:
var.variables[local.workspace].<variable name>To be honest, I really don’t love having to change my code in order to accommodate different an automation solution. It feels like sacrificing my module’s logic for CI. I’ve generally gone with the second option listed above, however workspaces are supposed to give you the option to deploy different environments from the same module in order to keep your code dry, and I wanted to give it a shot. Hopefully Hashicorp adds -var-file as an option soon, because not having it is kind of a drag.
Workspaces
Before I can deploy this resource using Terraform Cloud, I’ll have to set up my workspaces. If you’re following along and you don’t yet have a TF Cloud account, you can sign up for one here. Quick aside on workspaces. A workspace is a Terraform concept where multiple states can exist for the same module, commonly used to differentiate between environments, e.g. test, staging, production. A “workspace” maps 1:1 with a state file.
Confusingly, traditional CLI workspaces are not the same as Terraform Cloud “workspaces” as you can see from this snippet of the docs:

Terraform Cloud workspaces are described like so:

I get what they’re saying… but in the end there is still one state for each workspace and they work interchangeably, so I don’t really understand why its implied that Terraform Cloud workspaces aren’t alternate state files. I suppose it’s because In TF Cloud a “workspace” also means the product features associated with it, but it’s oddly worded. Anyway, to understand how workspaces… work, it’s good to set one up in the TF Cloud console first, which gives you the following setup screen:

There are three options to choose from. Each has its pros and cons. Let’s examine them.
VCS Workspaces
VCS workspaces are by far the easiest to set up. It handles a lot of automation for you. Without needing to add your own build step, Terraform Cloud will clone your repository, run a plan, and provide a nice green check once the plan passes (and what developer doesn’t like green check marks?):
If your repository has submodules, it handles this too granted a satisfactory ssh key is provided. Once the PR is merged it will begin an apply run which must be approved in the Terraform Cloud console (if required). There are a lot of pros to this option. It’s probably the easiest way to get set up with TF Cloud Automation and it prevents applies from the console, which you might want to restrict. However, it’s a bit limiting as well and there are some cons.
VCS Cons
As mentioned, you won’t be able to run applies from the command-line, which you might want, but it also pretty limiting. TF Cloud doesn’t give you the option to run additional code alongside your plan/apply steps in a build script (some of the other TACOS do) so you might want to opt for the more manual CLI approach to give you that flexibility.
Additionally, if you only work off of a single main branch in version control, you won’t really be able to promote changes from one environment to the next on your own terms. All applies are queued at once when the PR is merged. This isn’t really a problem for a repository with a multiple branch git-flow setup, e.g. “develop”, “staging”, and “main”. However, if you rely on your CI/CD pipeline to roll out changes to each environment in succession, it’s not so great. With one main branch and multiple workspaces, order is not guaranteed. Runs happen in any order that you approve them in the TF Cloud Console. Let’s say you merge and the test and staging environments start a run and are waiting for you to hit “approve” on each to initiate an apply. You could feasibly lick “run: the staging environment before test, which shouldn’t be allowed. Additionally, considering that all runs are queued and TF Cloud has concurrency limits, it’s also possible that you’d be forced to apply production before test because test is stuck in the queue!
Also, because VCS workspaces only include a link to the plan result in the PR, all users must have an account to view the plan. If you’re running your plan more manually you can make the plan output to github in a comment just part of the flow. For these reasons, I’m going to opt for CLI workspaces for the rest of the demo (also, VCS workspaces are fairly easy to figure out anyway).
CLI Workspaces
CLI workspaces are a bit more manual in that you have to run a plan and apply yourself in your CI environment, but gives you more control over when the apply happens, as opposed to happening immediately upon merge. In the case where you only have one main branch, you can build a deployment pipeline that sequentially applies changes to each of your workspaces. Also, you can add additional steps, like smoke tests after your apply script. With the VCS option you’re stuck with a webhook to add additional automation and checks after your apply.
However, the setup is more complicated and you’ll need to add a TF Cloud Token as secret for Github Actions (or wherever CI tool you use to run your Terraform).
API Workspaces
API workspaces aren’t really a separate type of workspace. You can apply them from the commandline like CLI workspace, and the /run API endpoint can be used on CLI, API, or VCS workspaces. The setup for a CLI and an API workspace is exactly the same as far as I can tell. I think TF Cloud just included it as an option in the builder to point out that running your Terraform with an API call is a feature. For the record, creating an apply run with a workspace looks like this:
export TOKEN="<your token>"
curl \
  --header "Authorization: Bearer $TOKEN" \
  --header "Content-Type: application/vnd.api+json" \
  --request POST \
  --data @create_run.json \
  https://app.terraform.io/api/v2/runs
where your data is:
{
  "data": {
    "attributes": {
      "is-destroy": false,
      "message": "This is an API driven run"
    },
    "type":"runs",
    "relationships": {
      "workspace": {
        "data": {
          "type": "workspaces",
          "id": "id-xxxxxxxxx"
        }
      }
    }
  }
}
However, with only the above initial setup, this would only work off the bat for a VCS workspace. In order to do a remote run, TF Cloud needs the terraform resource files to run and compare against state. One of the advantages of a VCS workspace is that on each run TF Cloud will pull files from your version control provider. A CLI workspace will require you to upload a “configuration” in the form of a zip file with your Terraform code.
Terraforming Terraform
It’s fairly simple to click around in the TF Cloud console to set up your workspaces, but this isn’t very repeatable so I made this small Terraform module to do it. “Terraforming Terraform” like this is actually one of the reasons Terraform Cloud is a nice option, but other TF automation solutions offer providers as well.
Here’s an example of a workspace resource using the Terraform Cloud provider:
And here is the generalized module I created (by the way this lives in the workspaces section of the demo repository):
As you can see it also reaches out to a child module called “tf-cloud-variables”, a module I created to create Terraform Cloud variables with the option to pull sensitive data from AWS SSM Parameter store. That module looks a bit like this:
Of course, it has a bunch of stuff removed. You can see the full module in the repo. The point is to allow me to include my variable & environment variable declarations alongside my workspace declaration as you can see in the example tfvars file below:
I removed the other two workspaces to cut down on space but they’re exactly the same with the exception of environment values/workspace names. By setting vcs_repo to null the workspace becomes a CLI workspace. There’s no way to choose CLI or API (which makes me think they’re kind of the same thing). As you can see I’ve included two variables here: environmentandregion that will be used in the previous module to create the local variable: workspace, which will allow the module to pull the correct config for the environment in which it’s being run.
However, before the workspaces can be set up, the Terraform Cloud provider needs to be added:
The tfe_token will need to be a team or user token which can be created on the TF Cloud app. I added this variable to a secrets file included in my gitignore called secrets.auto.tfvars. With this in place using the correct variables a workspace will be created for each environment of the module.
After applying the workspaces module you should see them created in the TF Cloud console (and in your terraform command-line output):
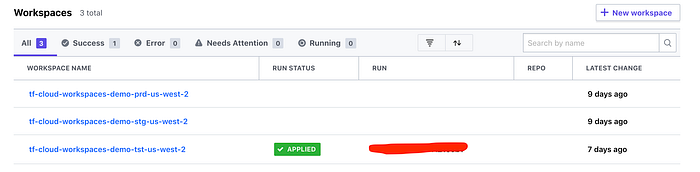
(the “applied” bit wouldn’t be there yet, but I took this picture a while after creating the initial workspaces).
By the way, I didn’t set up a backend for this workspaces module, but ironically you would probably have to do so in the console initially, or create the workspace module’s workspace without a workspace and then add it after the fact… meta.
Terraform Cloud Backend
Now that the workspaces have been set up we can actually start using them! To do so we’re going to head back over to the S3 module and add the Terraform Cloud Backend, which looks like this:
This will replace whatever backend you’re currently using. One thing to note is the prefix setting. This is how Terraform Cloud sets up multiple workspaces for a single module. Any workspace beginning with the above prefix tf-cloud-workspaces-demo- will be an option when you run terraform init .
However, before you can run plan you also need to set up your .terraformrc config with your token. This can be accomplished by running terraform login or by copying the following into a file in your home directory called .terraformrc
credentials "app.terraform.io" {
  token = "<your token here>"
}
Following that, when you run terraform inityou will be greeted with the following input:
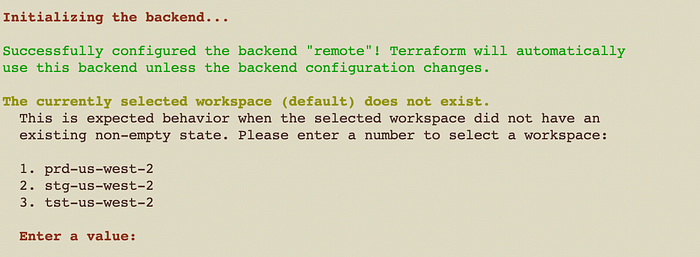
From there you can choose the workspace you would like to use locally to run plans.
Local Workspaces
Workspaces are meant to be run in a consistent environment on TF Cloud servers (this might be another reason they like to differentiate from “CLI” workspaces). So even when you run your plans locally, they’re actually streaming results from a TF Cloud server. However, if you want to run the Terraform on your own computer and just use TF Cloud for the state management, you can do so by setting your workspace to “local”.
IAM & Assume Role Provider
There’s one more necessary step before these resources can be deployed. I will be running this Terraform using a roll since this will be automated and I won’t be using my own credentials. Because I won’t be using an on-prem agent with Terraform Cloud, I need to provide some separate credentials. This means creating a user with perms to create/update the specified bucket and bucket object. Or, more precisely, a role with permission to create/update the bucket which the Terraform user is able to assume. Since I’m lazy and don’t feel like working for least perms, the policy resource for that assumed role looks like this:
The for_each here iterates through each workspace, which I mentioned before are tst-us-west-2 , stg-us-west-2 , and prd-us-west-2 . The role for that policy looks like this:
As indicated by this line:
AWS = data.aws_iam_user.deployment_user.arnThe role is only able to be assumed by the user defined in the console. Now that both the role and the user are created, the module’s AWS provider can be updated like so:
As you saw above I provided the AWS_ACCESS_KEY_ID and AWS_SECRET_ACCESS_KEY environment variables in each of the Terraform Cloud workspaces (using the keys of the user I created earlier with perms to assume the deployment role).
What’s kind of cool about this is the person running the Terraform doesn’t even need AWS permissions to run plans/applies — they only need permission to access the environment in Terraform Cloud. This significantly reduces the amount of perms lying around with access to change infrastructure.
Another option here would be to provide temporary credentials for the assumed role via environment variables AWS_ACCESS_KEY_ID , AWS_SECRET_ACCESS_KEY , and SESSION_TOKEN . Then permanent credentials wouldn’t be necessary and the “assume_role” could be removed from the aws provider. However, that would also require some automated process to update the temporary credentials on a daily basis, which I won’t be doing here.
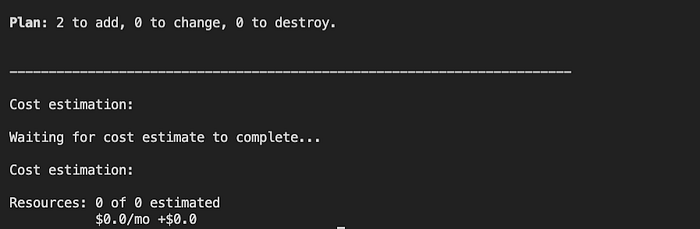
Now that the provider is in place, I can test it out by running a plan locally, which starts off like this:
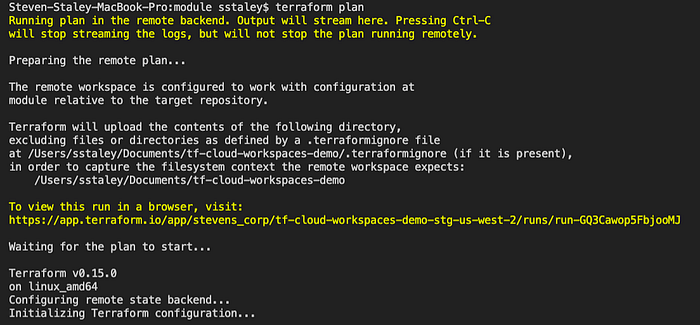
A quick scan shows that the plan is being run on a linux machine using Terraform v0.15 and a nifty link is provided that can be used to share the output of the plan. Following that we get our plan as well as a cost estimation:
Github Actions
Now all the pieces should be in place for a fully automated deployment. To get started with Github Actions, you’ll need to add a TF Cloud token to the repository’s secrets. You can find by the secrets section of Github by navigating to settings -> secrets in your repository. I’ll be naming this token TF_CLOUD_TOKEN .
Plans
When PRs are created we’ll want an action to run a plan for each workspace. The Github Actions workflow for that looks like this (and as I mentioned before I used this tutorial for this part of the demo):
As before, I removed the stg and prd jobs to save space because they’re exactly the same. To clarify what’s going on here, the on section declares that the following list of jobs will be triggered on pull requests against the main branch. paths indicated which folder paths will be watched for changes. Another important bit is the env section with one environment variable defined: TF_WORKSPACE . This tells Terraform what workspace to pick. Without this, init will require manual input.
Following this, the job plan-tst performs the following actions:
- Checkout (checkout the repo)
- Setup Terraform (download the required Terraform version)
- Terraform Init (initialize the workspace)
- Terraform Format
- Terraform plan
- Update Pull Request (Comment the plan onto the pull request)
- Terraform Plan Status (Exit 1 if the plan fails)
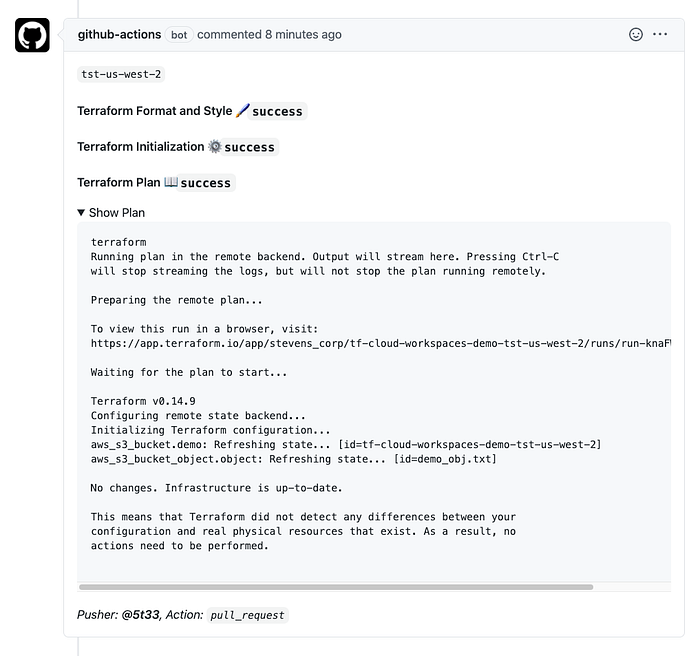
These steps are fairly straight forward but there are a few things to highlight. First, cli_config_credentials_token:${{ secrets.TF_CLOUD_TOKEN}} provides the token that I added as a secret to the Github repo. Second, the environment variable TF_WORKSPACE which is set at the job level sets the workspace to tst-us-west-2 . This tells Terraform which workspace to use, otherwise init will require input. Finally, continue_on_error allows the job to continue even when a plan or fmt command fails so that these results can be used as output to the comment. Also, I have the job filtered on the module directory so that only changes to the module will kick off these plans.
Now, once a PR is created, these plans will run and post their results to the PR:
Applies
The GH action above provides a blueprint that can be easily adjusted to run applies in each workspace successively, with approvals between actions. When Terraform Apply is run on a TF Cloud workspace, you have the option to approve it from the TF Cloud console:

So, there isn’t really any need to add additional logic to add approval gates between environments. Additionally, since Terraform Cloud has its own access-control, so you aren’t dependent on Github authorization for approvals. This is helpful if your Github controls aren’t as tight as you would like for approving infrastructure changes.
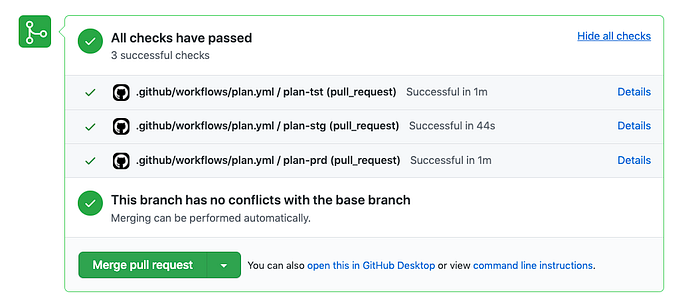
To update the Github Action for applies, I’ll first be changing the on condition to push which means the workflow will be kicked off when the PR is merged. Second I will be adding the need configuration to the stg and prd jobs so that they wait on each other to complete before starting. If one fails, the next will not start. Finally, I’ll be removing the fmt command and the PR comment because they aren’t necessary for the apply stage. In the end we’ll get something like this (this time I left all workspaces in):
Now when I merge a PR, the job kicks off:

Which I can then approve in the TF Cloud console:

And after applying that change, I see the next job start:

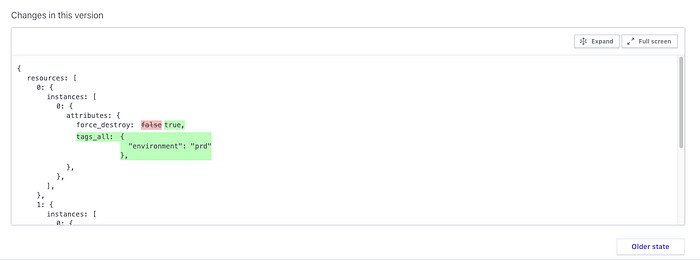
Audit Trails
Another cool aspect of Terraform Cloud (and other TACOS) is that state diffs are recorded for every infrastructure update, so after the apply you can go back and see how your state was changed:
Sentinel
Sentinel is Hashicorp’s Policy As Code language which comes built in to a few of their products. With Terraform Cloud, Sentinel allows you to specify rules which plans must adhere to in order to pass. You can enforce restrictions on pretty much anything you want: EC2 size, public S3 buckets, open security groups, wide IAM policies, etc. In fact, since TF Cloud also does cost estimation, you can enforce cost restrictions as well. These enforcements can either be ‘advisory’, ‘hard-mandatory’, or ‘soft-mandatory’.
As with Workspaces, the Terraform Cloud provider allows you to create Sentinel policies using Terraform. That resource looks like this:
These policies can be applied to individual VCS repositories, specific workspaces, or globally across all workspaces. I’ll be creating one that will be global policy to ensure all buckets are private, which looks like this:
must_not_be_public.sentinel
This policy, which is applied to a plan output via the tfplan/v2 import, filters through all resource changes for actions that are “create” or “update” on resources which are “aws_s3_bucket”. It them checks the acl attribute for public options. Then, that same process is done for bucket objects. At the end, each of these lists is checked for a length of 0. This occurs in the main rule, which is the entry point of the policy, (by the way this policy originally came from a Hashicorp demo, but for the life of me I can’t find it).
Testing Sentinel
To know whether this policy actually does what we want it to, it needs to be tested, which requires mock data. You can download data from any plan run in Terraform cloud by navigating to the run and hitting the “download sentinel mocks” button:
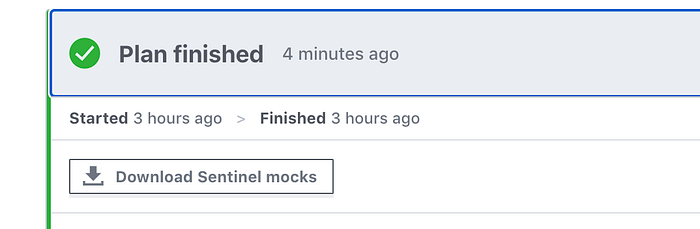
Note: This is called “mock” data but seems to include sensitive values. Make sure to scan them before adding to your version control.
Once these are downloaded, you can unzip them with tar:
tar xzf ~/Downloads/run-xxxx-sentinel-mocksA variety of files are provided, one of which will be called mock-tfplan-v2.sentinel . This corresponds to the data available when the tfplan/v2 is used. This is what I’m using to mock my plan for my sentinel tests. One thing to be careful of here is that sensitive data is included in these mock plans, which you’ll want to strip before making a commit.
Sentinel uses file structure to determine where tests are located. Your sentinel policies should be at the base of your directory and all tests should be in the "test” folder like so: test/<your_policy_name>/*.json . Each sentinel policy has its own folder with potentially multiple tests. Following this format I have the following file structure:
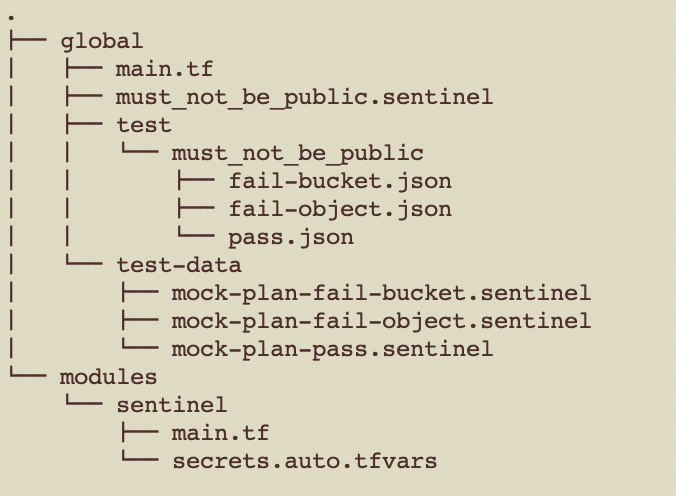
The global folder holds sentinel policies applied globally. If I were to include workspace or repo specific policies I would include them in workspaces/<workspace name> or repository/<repository name> folders. module holds shared Terraform modules that will be shared across multiple folders.
Each test in file looks something like this:
fail-bucket.json :
{
  "mock": {
    "tfplan/v2": "../../test-data/mock-plan-fail-bucket.sentinel"
  },
  "test": {
    "main": false
  }
}
the mock section points to the mock data that was altered to fail the sentinel check for a public bucket, and the test section asserts that the main check is false for the provided mock data.
After running sentinel test I get the following output:
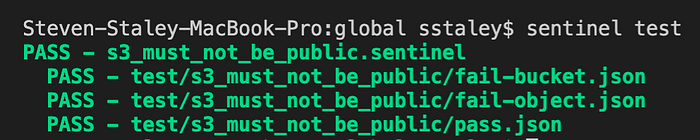
All three tests I wrote pass, so I can move on to deployment.
Terraforming Sentinel
As with the workspaces module from earlier, I also created a sentinel module to centralize and reuse my sentinel code. A sentinel policy Terraform resource looks like this:
resource "tfe_sentinel_policy" "test" {
  name         = "my-policy-name"
  description  = "This policy always passes"
  organization = "my-org-name"
  policy       = "main = rule { true }"
  enforce_mode = "hard-mandatory"
}
These policies are added to policy “sets” like this:
resource "tfe_policy_set" "test" {
  name          = "my-policy-set"
  description   = "A brand new policy set"
  organization  = "my-org-name"
  policy_ids    = [tfe_sentinel_policy.test.id]
  workspace_ids = [tfe_workspace.test.id]
}
A policy can either be applied to a set of workspaces or globally across all workspaces using the global flag (in which case workspace ids aren’t provided). As with the other Terraform Cloud provider resources, I’ve bundles these two up into a module that I won’t get into this time, but which allows me to declare my policy sets as a map of workspace names to policies like so:
This results in the following resources being created:
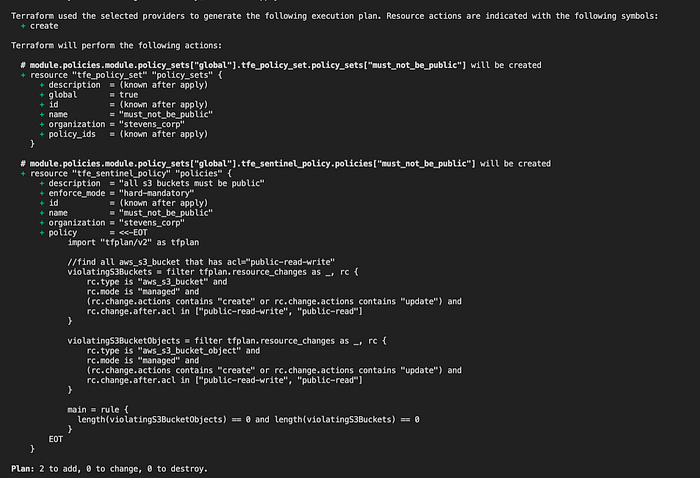
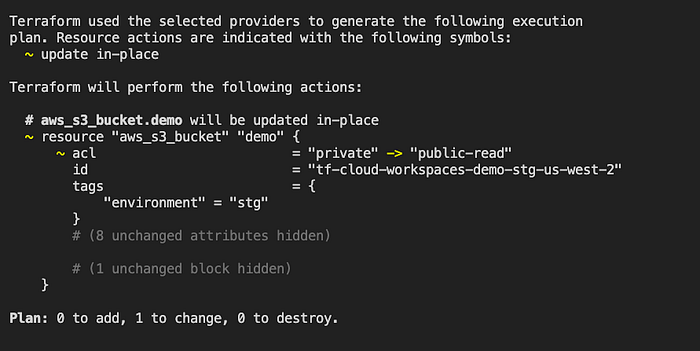
Now I can test the policy by pushing a change that would make my bucket public. Let’s see what happens when I set acl to “public-read” on my s3 resource like this:
resource "aws_s3_bucket" "demo" {
  bucket = "tf-cloud-workspaces-demo-${local.workspace}"
  force_destroy = var.variables[local.workspace].force_destroy
  tags =  var.variables[local.workspace].tags
  acl = "public-read"
}
With the public-read option on, I suddenly get this output when I run a plan (in two photos because my screen wasn’t bit enough):
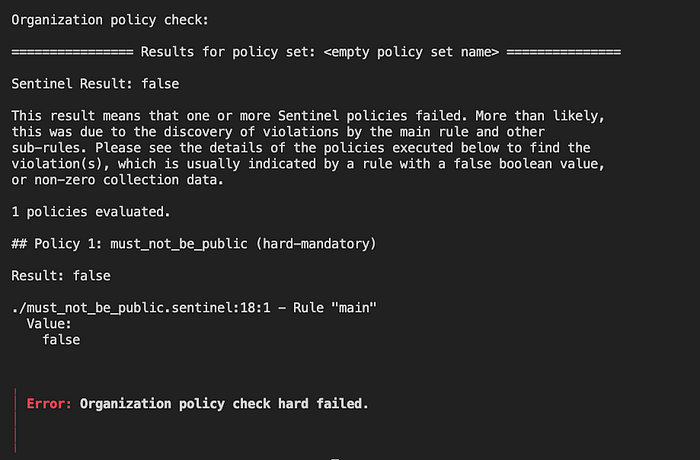
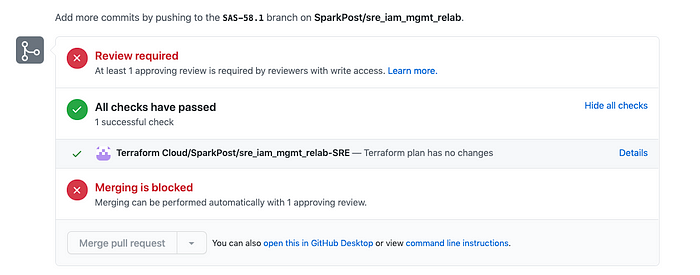
And it failed the check! Although the “empty policy set name” is odd… but it doesn’t seem like a huge deal. Just for the heck of it I’ll also push this to a PR in Github to see the plan fail there as well.
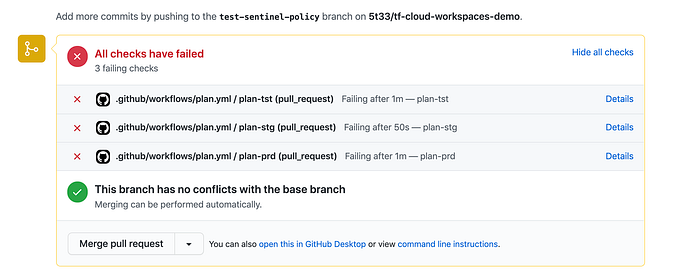
And just like in the local run, all my Github checks have failed. Success! Or.. err.. Failure… I guess.
Conclusion
As you can see… TF Cloud! Nice. It does the things.
I can see these tools being quite useful for larger organizations so that developers can share runs easily, have a consistent deployment environment, enforce infrastructure policy, monitor costs, provide state audit trails, and potentially run automated infrastructure changes via API calls. However, even for a smaller org, just having Terraform Cloud manage your remote state with locks instead of an S3 bucket and a dynamodb table (or however you choose to do so) is nice. S3 has been the cause of a few high profile security incidents, so shipping that responsibility to a managed service can be helpful. And you can always add on features like remote execution & sentinel policies later.
That being said, some of the other services I listed in the beginning also have strong offerings and may beat the price of Hashicorp. Additionally, many of them allow you to write your policies in OPA, which is open source, so you can still potentially use them even if you stop using the service. Sentinel doesn’t provide that option. Some of them might even offer support for -tvfars so you don’t have to edit your code to use multiple workspaces in a single folder.
I hope this was informative and provided a broad overview of infrastructure automation with Terraform Cloud. If you have any questions or comments, feel free to reach out via linkedin at https://www.linkedin.com/in/steven-staley/.