Develop awesome webapps using VueJS + Webpack (demonstrating by building a XRP ledger integration)

Vue (pronounced /vjuː/, like view) is a progressive framework for building user interfaces.
Using VueJS, you can combine writing HTML and Javascript. Vue will then keep your Javascript objects and HTML in sync. This means your events in your DOM (HTML) can mutate the VueJS Javascript objects, resulting in modifications in your DOM (and the other way around).
Here is a simple example — This small piece of HTML + VueJS code allows you to add and remove Todo’s.
You can use Vue in vanillajs projects (so: just write plain old Javascript), but you probably want to do a bit more. How about using ES6 syntax, modules, npm packages, etc.?
And: how about live-reload to make development easier? How about packing everything and make your project ready for deployment to browsers?
This tutorial may require some knowledge about html, javascript and the basics of virtual dom.
NPM
npm is the package manager for JavaScript and the world’s largest software registry. There is an amazing amount of packages, ready to use, available at https://www.npmjs.com
When you have nodejs installed on your PC, you will automatically have npm installed as well. We are going to use npm in a minute, so make sure you have node (js) installed.
Meet vue-cli
There are a lot of tools that, combined, will allow you to start developing your VueJS webapp in seconds. All the good stuff is already available for you in templates. vue-cli allows you to kick off your project.
Let’s install vue-cli globally (the -g option):
npm install -g vue-cliNow you have the vue init command available (and since we’ve installed vue-cli globally, you can run this command from every folder (in your terminal))
The vue init command allows you to specify a template package and a project folder. After a small install wizard your project folder will be created with lots of tools and config pre-installed, allowing you to start development.
The vue webpack template
The webpack template for VueJS comes with lots of awesome tools pre-installed and pre-configured:
- Development webserver with auto-reload
- ES6 syntax support (import, require, etc.)
- Build tools (to compile, minify, etc.) for deployment to the browser
- Routing
- Vue components (combine the Vue HTML template with the vue object and styling in one component (file))
- Debugging tools
- Syntax linting
Create your first project
Go to the folder where you would like to create your vue webpack project (folder), and run:
vue init webpack sampleproject
This will create a vue webpack project in the folder (will be created) sampleproject/.
You’ll have to enter:
- Project name (a-z-)
- Project description
- Author (name <mail>)
- The Vue build (select “Runtime + Compiler”)
- Install vue-router
If you want to develop a multi-page project, where components can have their own URL. This tutorial will not cover routing, so select No (n) if you want to try out Vue + Webpack and keep it simple. - Use ESLint?
ESLint will check your code. It will suck at first (since it will even compain about extra spacing, missing spaces, etc.) but it helps you write consistent code. I would pick Yes (Y) 😇 - ESLint preset: select Standard.
This is the ruleset ESLint will use to check your code - Set up unit tests: No (N) for now. We’re just getting familiar with vue webpack, unit tests are another level.
- Setup e2e tests: No (N) for now.
- Should we run `npm install`?
Select Yes, use NPM. This saves us another command ;)
Your project will be created and all dependencies will be downloaded and installed in your project. This will take a minute. npm may show a few warnings; as long as there are no errors you are probably fine.
Now open your project folder and start the development server:
cd sampleproject
npm run dev
The development server
You can launch a local development webserver using the npm run dev command. The server will be launched at http://localhost:8080, except if port 8080 is already taken: the port number will increment until a free TCP port is found. The development server will show the URL in your terminal.
Please visit it :)
You will see a Vue.js .sample page:

Shutting down the development server
Press Ctrl — C
Project (folder) structure
If you open your project folder, these are the relevant files and folders (for now):
index.html
The base HTML of your project. If you want to add stuff to your<head>,like atitle, meta-tags, etc. you can edit this file.static/
You can store your static assets over here, like images, fixed JS / CSS files, etc.src/The most important folder. This is where your Vue.js code livessrc/App.vueThe entry point of your applicationsrc/components/HelloWorld.vueThe sample content of your new project, visible when you visit your development server in the browser,
Of course there are more files and folders, but we won’t cover them now.
src/components/HelloWorld.vue
The src/components/HelloWorld.vue file contains most of the sample page when you visit your development server address at http://localhost:8080 — because src/App.vue imports this file, registers it as a Vue component and the src/App.vue file then displays the contents below the logo using <HelloWorld />
Now open src/components/HelloWorld.vue in your editor. You’ll see this file contains three ‘sections’ (root tags):
<template>...</template>This tag contains the regular HTML your vue component will render. You can mix Vue syntax with plain old HTML, and refer to other.vuefiles (if imported and registered, just assrc/App.vuedoes withHelloWorld.vue.<script>...</script>This is were modules are imported, and your Vue component is exported. The vue component can contain components, methods, data, etc.<style scoped>...</style>The CSS lives here. If the scoped attribute is present, the style will only affect the DOM in this specific module. If you omit the scoped attribute, styling can affect other components as well.
(If you prefer sass/scss, scroll down, I added a section about installing the sass/scss requirements for your vue webpack project)
Your first code
Edit src/App.vue — remove the <img ... /> tag (containing the Vue logo) and remove the styling at the bottom of the page (in the <style> tag).
Now edit src/components/HelloWorld.vue — remove the existing code in the file and replace it with the minimal code required for the component:
Your development server will automatically pick up the changes and your browser will show a very basic page with the message from the msg variable.

Now let’s add a few simple things to the code, showing you some of the basic (but still awesome) virtual dom tricks (manipulating your Vue object from the DOM and the other way around):
You will probably get it when you read the code;
- There’s a button calling the
toggleShowMoremethod. This method will update the Vue component data by invertingshowMore(this refers to this vue object, you can call methods or refer to data) - The button will either display “Show” or “Hide” depending on the state (true / false) of
showMore - The div with more information will only be visible if
showMoreis true.

Use npm modules
OK, great. You can write your html, css and javascript in .vue files. How about all those nice npm modules? How to add them to your project?
- Install the module
Quit your development server (Ctrl — C) and install the module. I’ll use the rippled-ws-client module: a module I wrote to make awesome applications for the XRP (cryptocurrency) ledger. We are going to check a wallet balance. Live. Awesome, right!? - Import the module
When the npm module is added to your project we need to ‘tell vue’ to use it. We’ll use theimportkeyword to do this. - Use the module
Let’s write some code!
To install the module, we run npm install with the --save attribute. This will add the module to the package.json file, so if we push our project to Git, the module is automatically installed when someone clones your repository and runs npm install.
npm install --save rippled-ws-clientNow start your development server again;
npm run dev… and edit src/components/HelloWorld.vue once more. In the <script> tag, above the export of our Vue object, we’ll import the module. We’ll add some more code as well (check the gist below).
Let me explain a few things first:
- At line 5 we use vue conditional classes, the key is the classname (CSS: line 63) and the value is the javascript condition to add this class.
- At line 21 we import the
rippled-ws-clientnpm module and name the moduleRippleClient— we can now refer to theRippleClientconstant in our code (line 34) - The XRP wallet address is hardcoded (for now) at line 27 — (This is my wallet. If you feel generous, be my guest 😇)
- The rippled-ws-client connects to a Rippled-server. We’ll use the public server
s1.ripple.com(line 34) - To fetch the balance for a wallet (an account), we send the
account_inforequest to the Rippled-server. When the server answers, we set the response data to the vue object (line 44 – 55) - We can refer to the vue object with
thisbecause we use the ES6 “spaceship operator”(args) => { function }for callback functions. Functions defined using the spaceship operator don’t overwrite thethiscontext.

Compile for the browser
So we created something awesome. Now you want to show your web application to the world. Your development webserver running at your own computer at localhost:8080 is great for development, but not publicly available.
Since everything you code in your Vue.js project is client side, you can just compile your project for the browser using the npm run build command. Your vue webpack project will be exported to the (newly created) dist/ folder. This is what will happen:
- JavaScript minified with UglifyJS v3.
- HTML minified with html-minifier.
- CSS across all components extracted into a single file and minified with cssnano.
- Static assets compiled with version hashes for efficient long-term caching, and an auto-generated production
index.htmlwith proper URLs to these generated assets.
We quit our development server using Ctrl — C and we run:
npm run build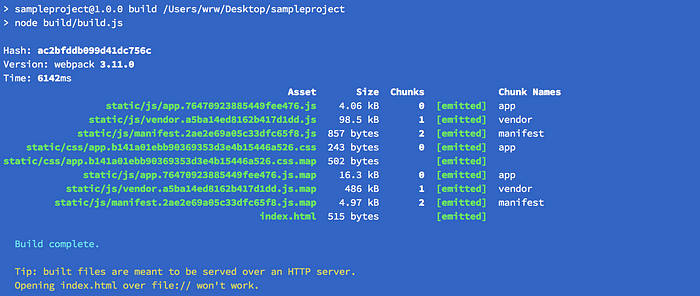
You can now grab the generated dist/ folder from your vue webpack project and publish the contents to a webserver.
Tip: To easily publish media or static websites to a unique website, I developed dlvr.cloud. Use a modern browser (eg. Chrome) to drag — drop the dist/ folder from your project to https://dlvr.cloud — your production ready vue webpack project is now online 😁

Extra
Use sass/scss in the `.vue` files
If you want to use scss (awesome, nested CSS styling, variables, etc.) in your vue webpack project you’ll have to install two packages, and add the lang="scss" attribute to the <style ...> tags in your .vue files:
npm install --save node-sass sass-loaderNow add lang="scss" to your <style> tag:
<style lang="scss" scoped>
  /* scss */
</style>
SCSS (nested css, functions) example
<style lang="scss" scoped>
  div {
    &.hello {
      font-family: Arial, Tahoma, Verdana;
      font-size: 1em; line-height: 1.5em;      .waiting { color: darken(orange, 10%); }
    }
  }
</style>