Quarkus + Angular with Keycloak — Pt2

Discover more on YouTube: If you’re looking for video content on technology, programming, and other topics, check out my YouTube channel! Subscribe to stay updated and learn more about these subjects.
Welcome back! In this article, we will continue the development of our daily-quotes application. If you haven’t read the first part yet, you can access it by clicking here.
The main goal of this article is to implement a REST API with Keycloak that will provide create and list quote endpoints.
Quarkus Application
To create the Quarkus backend service for creating and listing quotes through a REST endpoint, follow these steps:
- Go to https://code.quarkus.io/
- Configure the project with desired extensions and dependencies
- Include the following dependencies:
- Quarkus RESTEasy JAX-RS
- Quarkus Security Keycloak
4. Download the project
These dependencies enable REST endpoint creation and integration with Keycloak for authentication and authorization:

Creating our project structure
We won’t go into too much detail about the architecture, but we’ll create our application using hexagonal architecture and domain-driven design (DDD) principles. Let’s define some packages as follows:

Configuring the Database
To initialize our database, we need to define some variables.
- Open the
application.propertiesfile and set the following values:
quarkus.datasource.db-kind=postgresql
quarkus.datasource.username=postgres
quarkus.datasource.password=postgres
quarkus.datasource.jdbc.url=jdbc:postgresql://localhost:5432/postgres
quarkus.datasource.jdbc.max-size=16
quarkus.hibernate-orm.database.generation = drop-and-create
Notice that we have a running Postgres container, which was defined in the docker-compose.yml file.
Defining our Model
- For this application, we will have a class named Quote that will represent our model:
public class Quote {
    private Long id;
    private String message;
    private String author;
   //getters, setters ..
}
Creating QuoteService
QuoteService is an interface that provides two operations for our model.
- Here is the implementation:
@ApplicationScoped
@Transactional
public class QuoteServiceImpl implements QuoteService {

    @Inject
    QuoteRepository quoteRepository;

    @Override
    public Quote create(Quote quote) {
        quoteRepository.persist(quote.toEntity());
        return quote;
    }

    @Override
    public List<Quote> findAll() {
        return quoteRepository.findAll().stream().map(QuoteEntity::toDomain).toList();
    }
}
Creating QuoteController
This class will be responsible for exposing our endpoints through the use of JAX-RS annotations.
- Here is the initial implementation:
@Path("/quote")
public class QuoteController {

    @Inject
    QuoteService quoteService;

    @POST()
    @Produces(MediaType.APPLICATION_JSON)
    public QuoteResponse create(Quote quote) {
        Quote q =  quoteService.create(quote);
        return new QuoteResponse(q.getMessage(), q.getAuthor());
    }

    @GET()
    public List<Quote> list() {
        return quoteService.findAll();
    }
}
Above, we injected the service that will communicate with the repository that does the write and read operations.
Note: I haven’t included all the classes, but you can find the full implementation here.
Running the application
- Let’s run our application and see the results.
$ ./gradlew quarkusDev
Accessing endpoints
Great job😍! We have created our application and defined the /quote route for accessing our endpoints:
/POST:

/GET:

Protecting our routes
Great! Our application is now responding on the above two endpoints. Now, let’s protect our routes using Quarkus OpenID Connect (OIDC). As we created a client for our frontend application, we need to create one for the backend as well.
- Open Keycloak console and create a new client named backend like this:

- After that, we need to enable authentication for this client:

- Nice! Now, we need to get the client secret to use in our requests:

Changing our Application
- Open the
build.gradle.ktsfile and add the following Keycloak dependencies:
implementation("io.quarkus:quarkus-oidc")
implementation("io.quarkus:quarkus-keycloak-authorization")- Now, let’s define some properties in
application.properties:
quarkus.oidc.auth-server-url=http://localhost:8188/realms/daily-quotes
quarkus.oidc.client-id=backend
quarkus.oidc.credentials.secret=secret
quarkus.oidc.tls.verification=none- Now, open QuoteController and add the authentication annotation
@Authenticatedon thecreatemethod. It should look like this:
    @POST()
    @Authenticated
    @Produces(MediaType.APPLICATION_JSON)
    public QuoteResponse create(Quote quote) {
        quoteService.create(quote);
        return new QuoteResponse(quote.getMessage(), quote.getAuthor());
    }
Nice 😄! When we restart our server, our endpoint will now be protected, meaning that it is necessary to be authenticated to access this method.
Authentication by Token
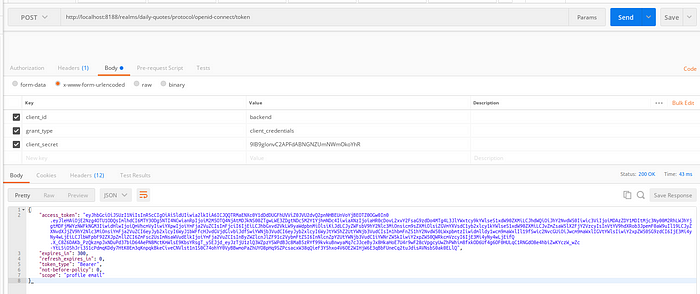
In this step, we need to retrieve the client registration that we defined in Keycloak (as shown in img08) and use it as the client secret to request an access token.
- client_secret:
9IB9glonvC2APFdABNGNZUmNWmOkoYhR- Let’s create a post request to get access_token:

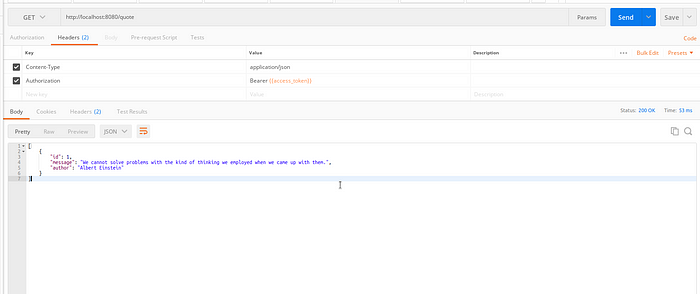
- Now we just send the access_token ou Authorization key:

Conclusion
In this article, we learned how to implement authentication in a Quarkus application using Keycloak. In the next and final part, we will consume these endpoints in an Angular application.
If you have any suggestions, comments, or contributions, please feel free to share them. The complete source code for this project can be found on my GitHub.
Thank you! ❤️

